
Overview
Specialized Lovelace cards for PetKit feeders, fountains, and related hardware when using the PetKit Home Assistant integration, exposing food levels, schedules, and device health in layouts tuned for pet-care automations. Bridges the gap between vendor apps and a unified smart-home UI. Maintained as TypeScript front-end modules with HACS-based installation for the homeassistant-extras community.
README
PetKit Device Card
PetKit Device Integration Related Cards
![]()
![]()


![]()
![]()

Built with the tools and technologies:
![]()
![]()
![]()
![]()
![]()
💡 Looking for more features? Check out my Device Card which does everything this card does plus many many more customizable features!
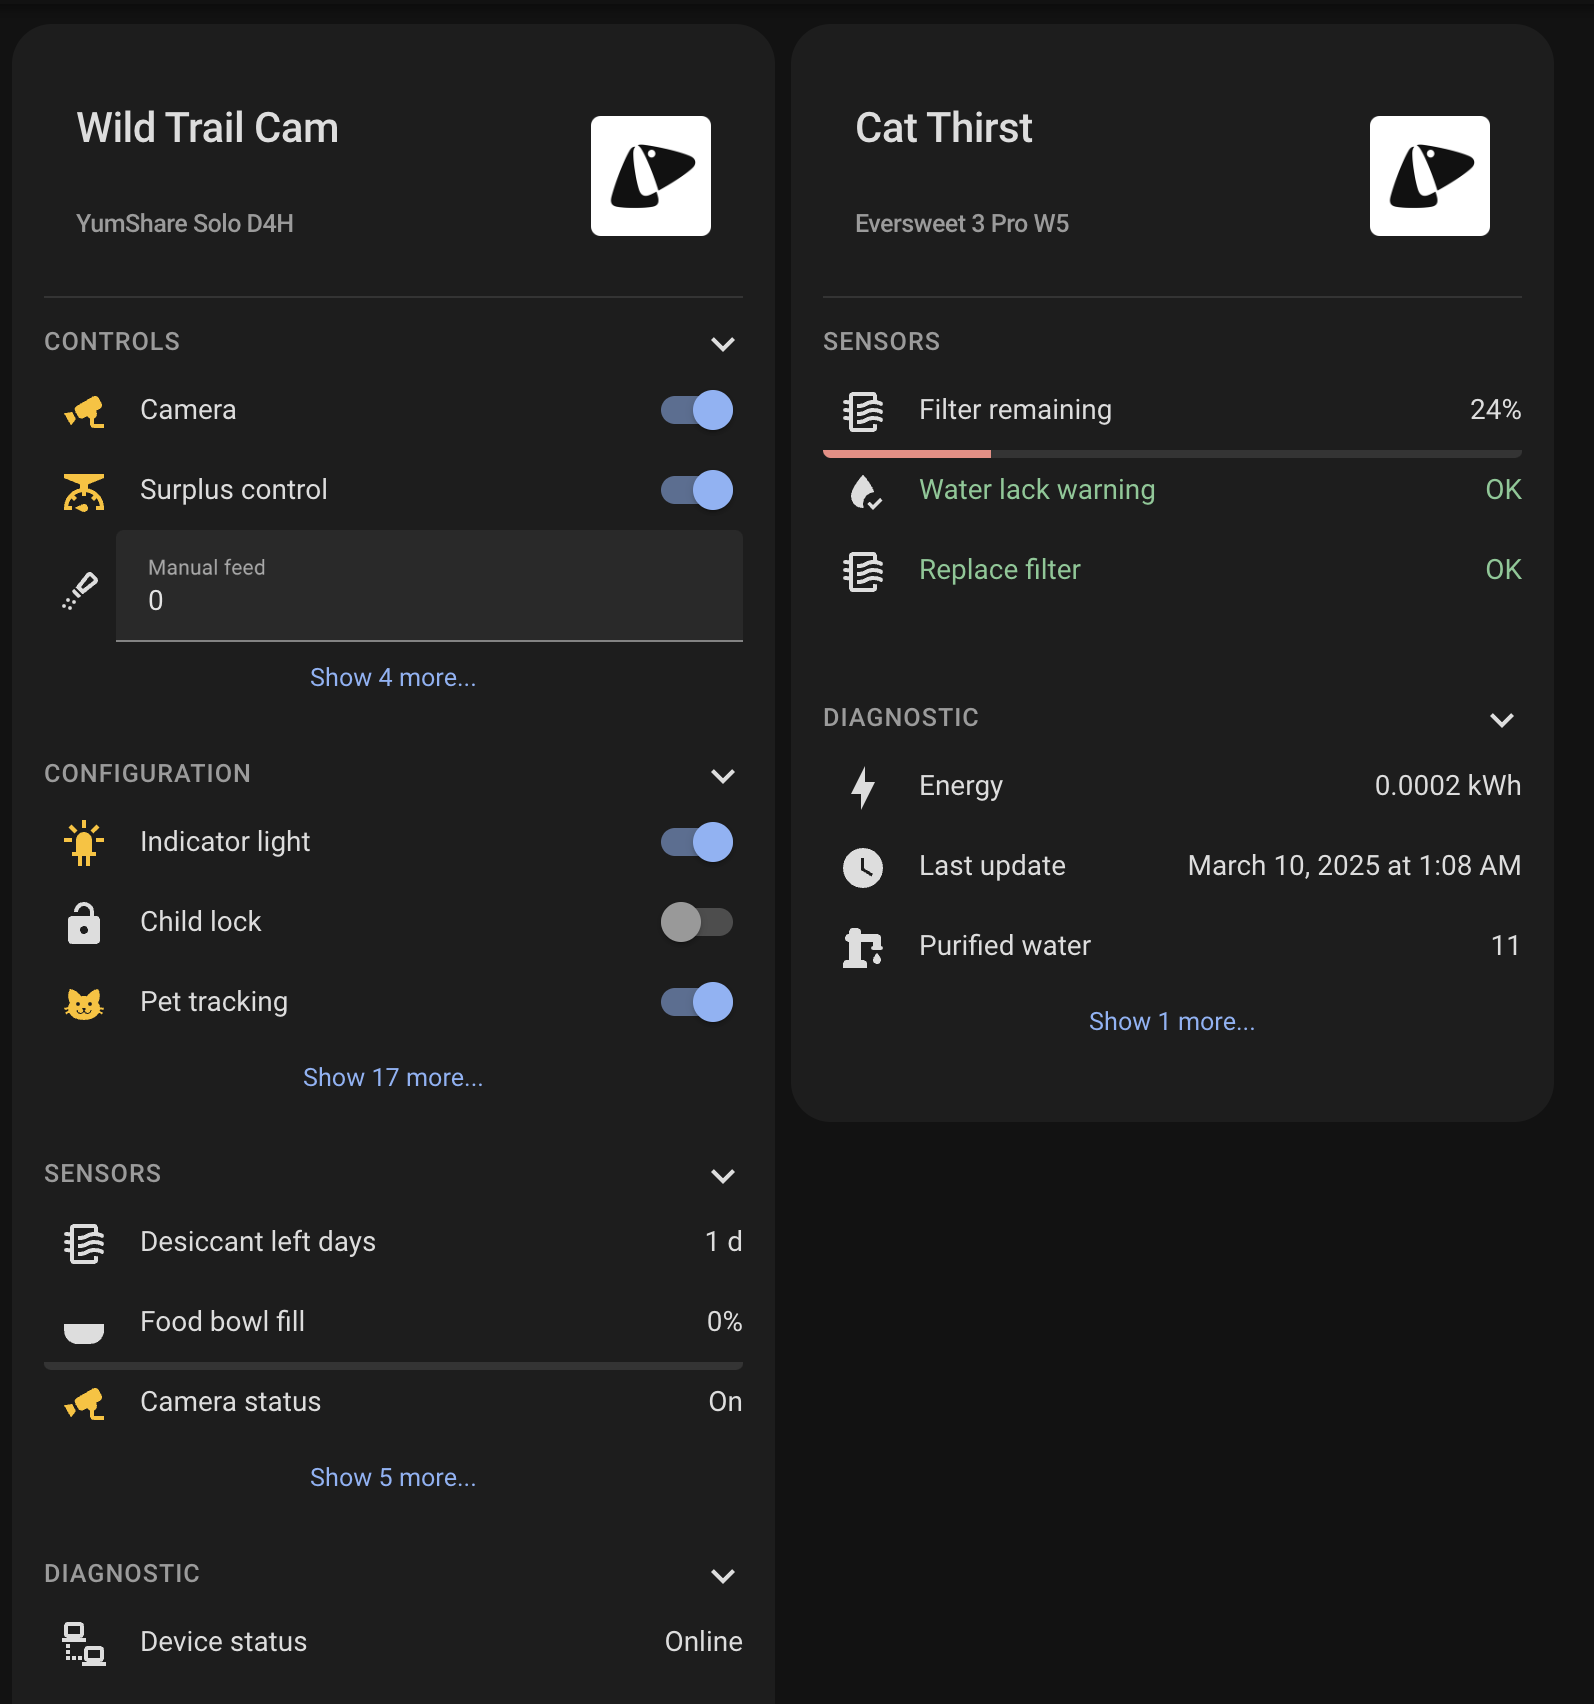
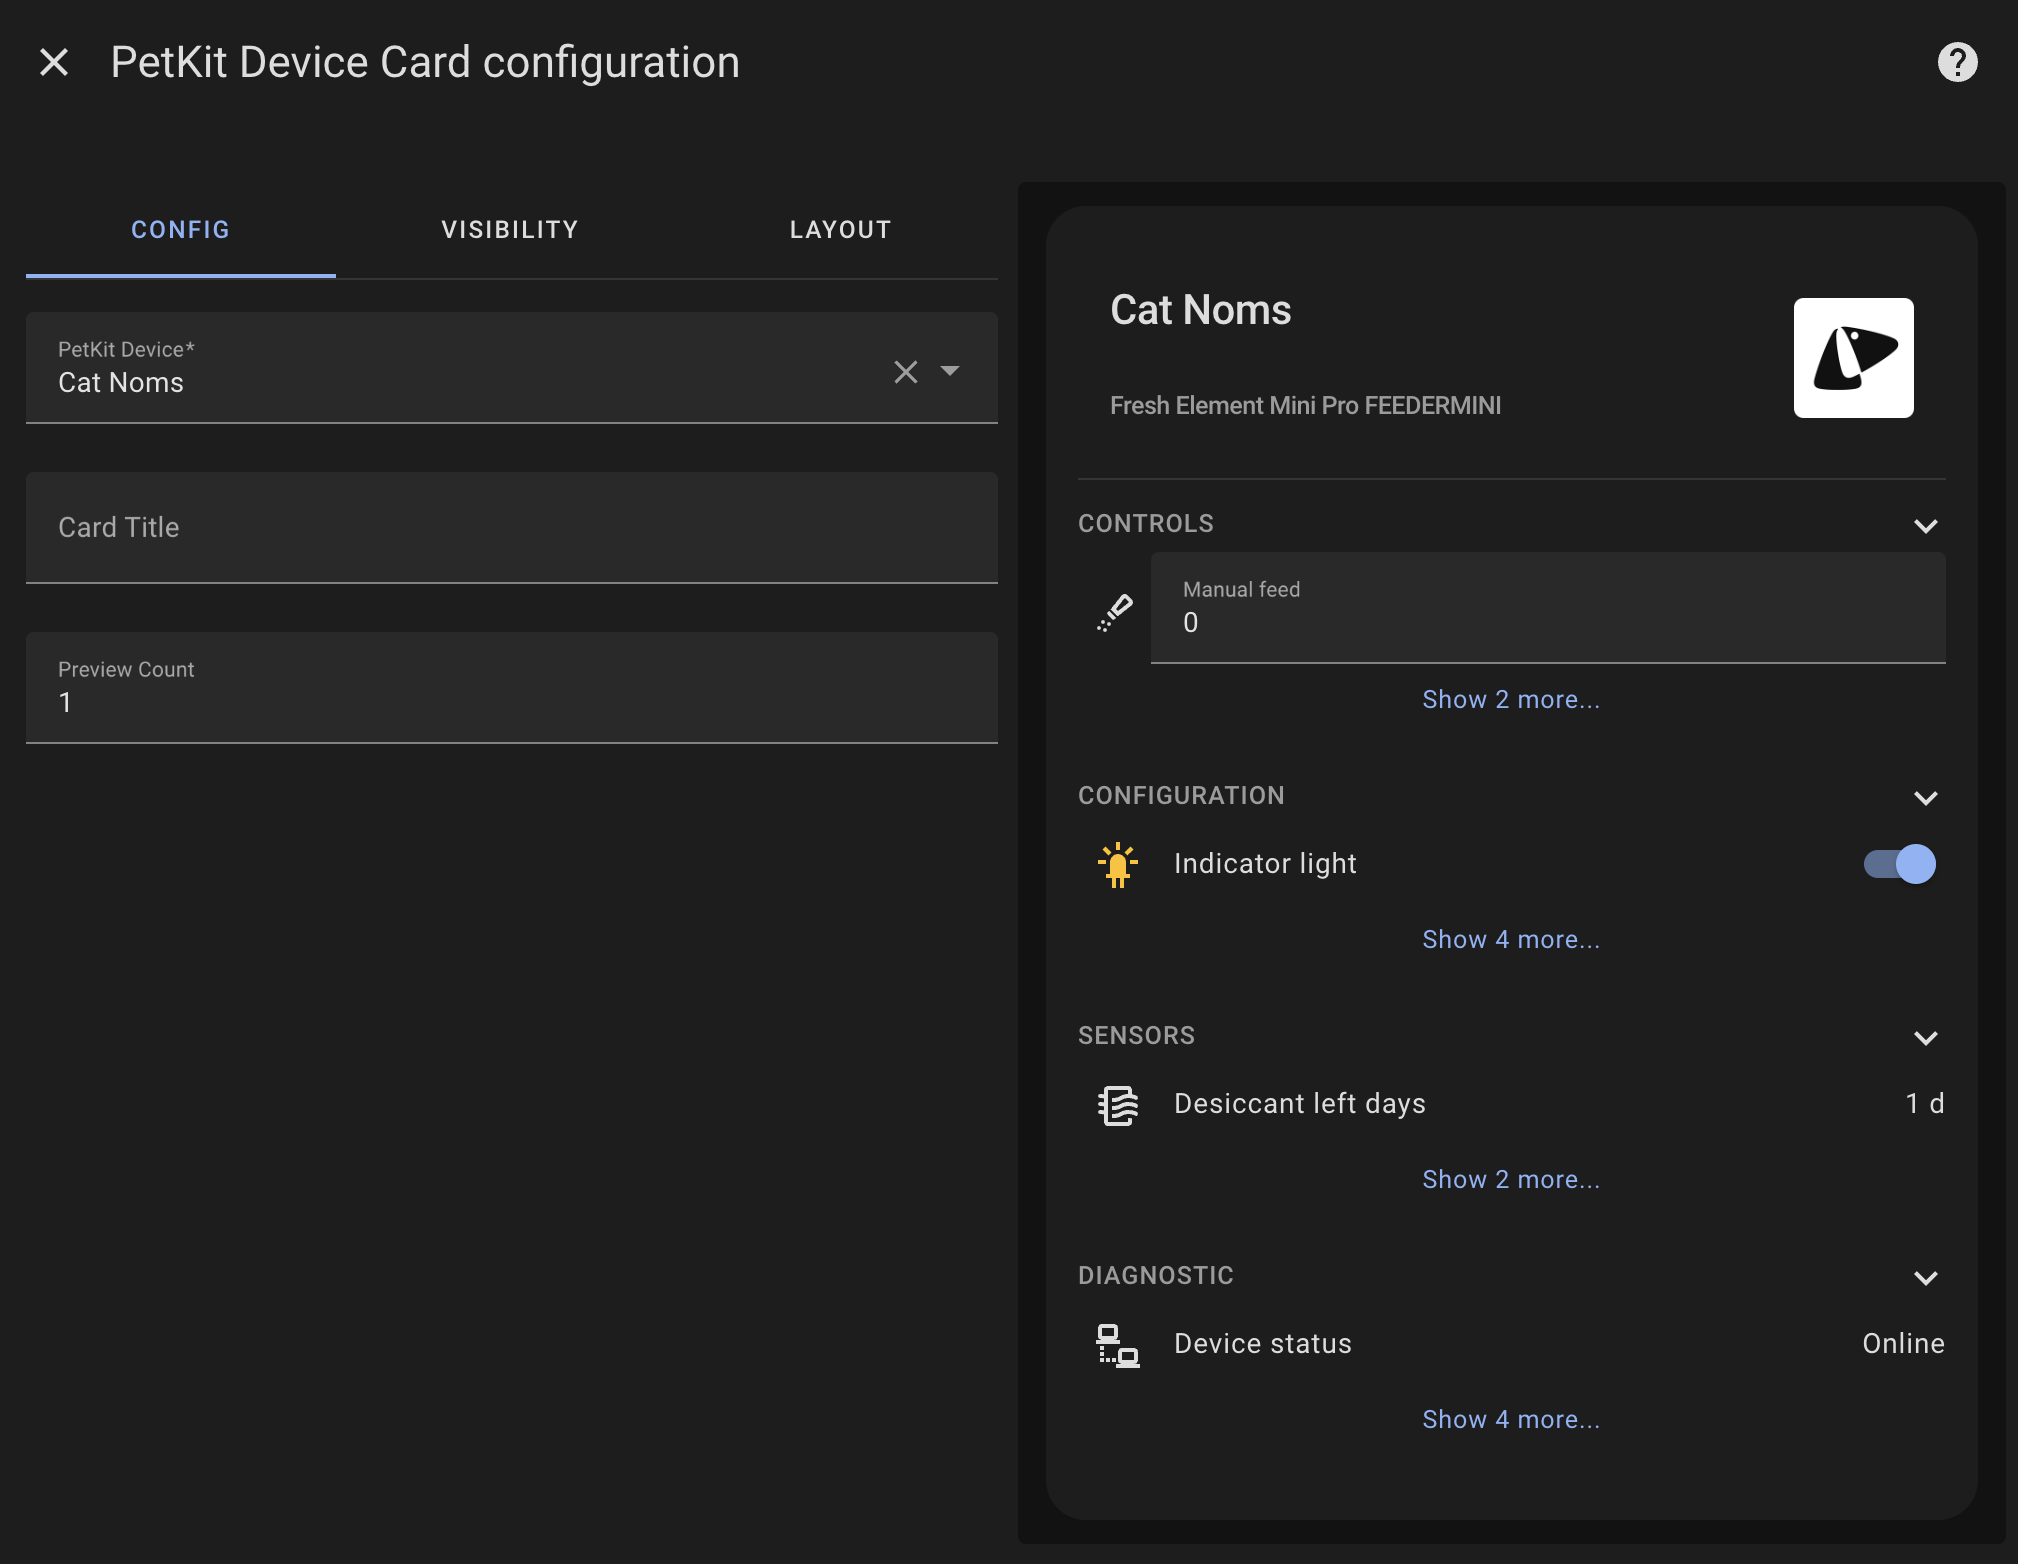
Overview
A custom card for Home Assistant that provides a comprehensive overview of your PetKit devices, including feeders, water fountains, litter boxes, and other pet care devices. The card organizes device information into expandable sections, displaying sensors, controls, configuration options, and diagnostic data in a clean, user-friendly interface.
Features
Device Information Display
- Shows device name and model information
- Organizes entities into logical categories:
- Controls - for interactive elements like buttons and switches
- Sensors - for data readings and status information
- Configuration - for device settings
- Diagnostic - for troubleshooting information
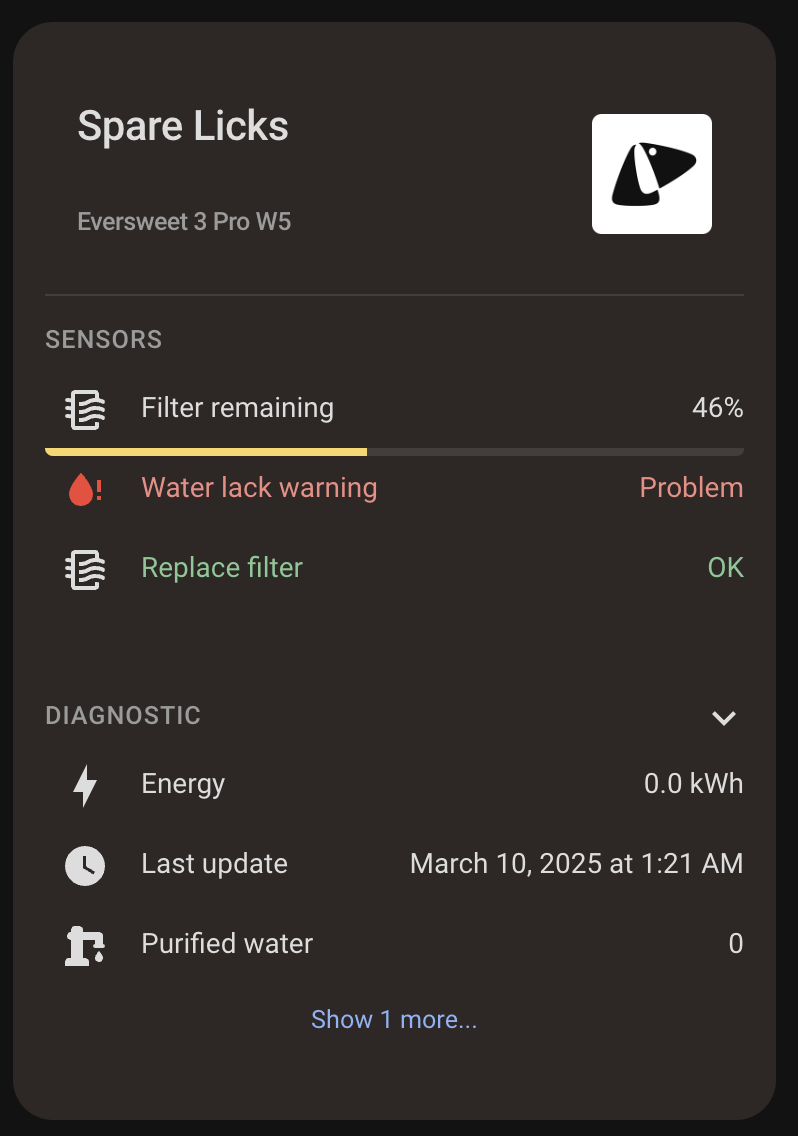
Problem Detection
- Automatically detects entities labeled as "problem" in the device
- Visual indication when problems are detected (card border turns red)
- Easy identification of issues requiring attention
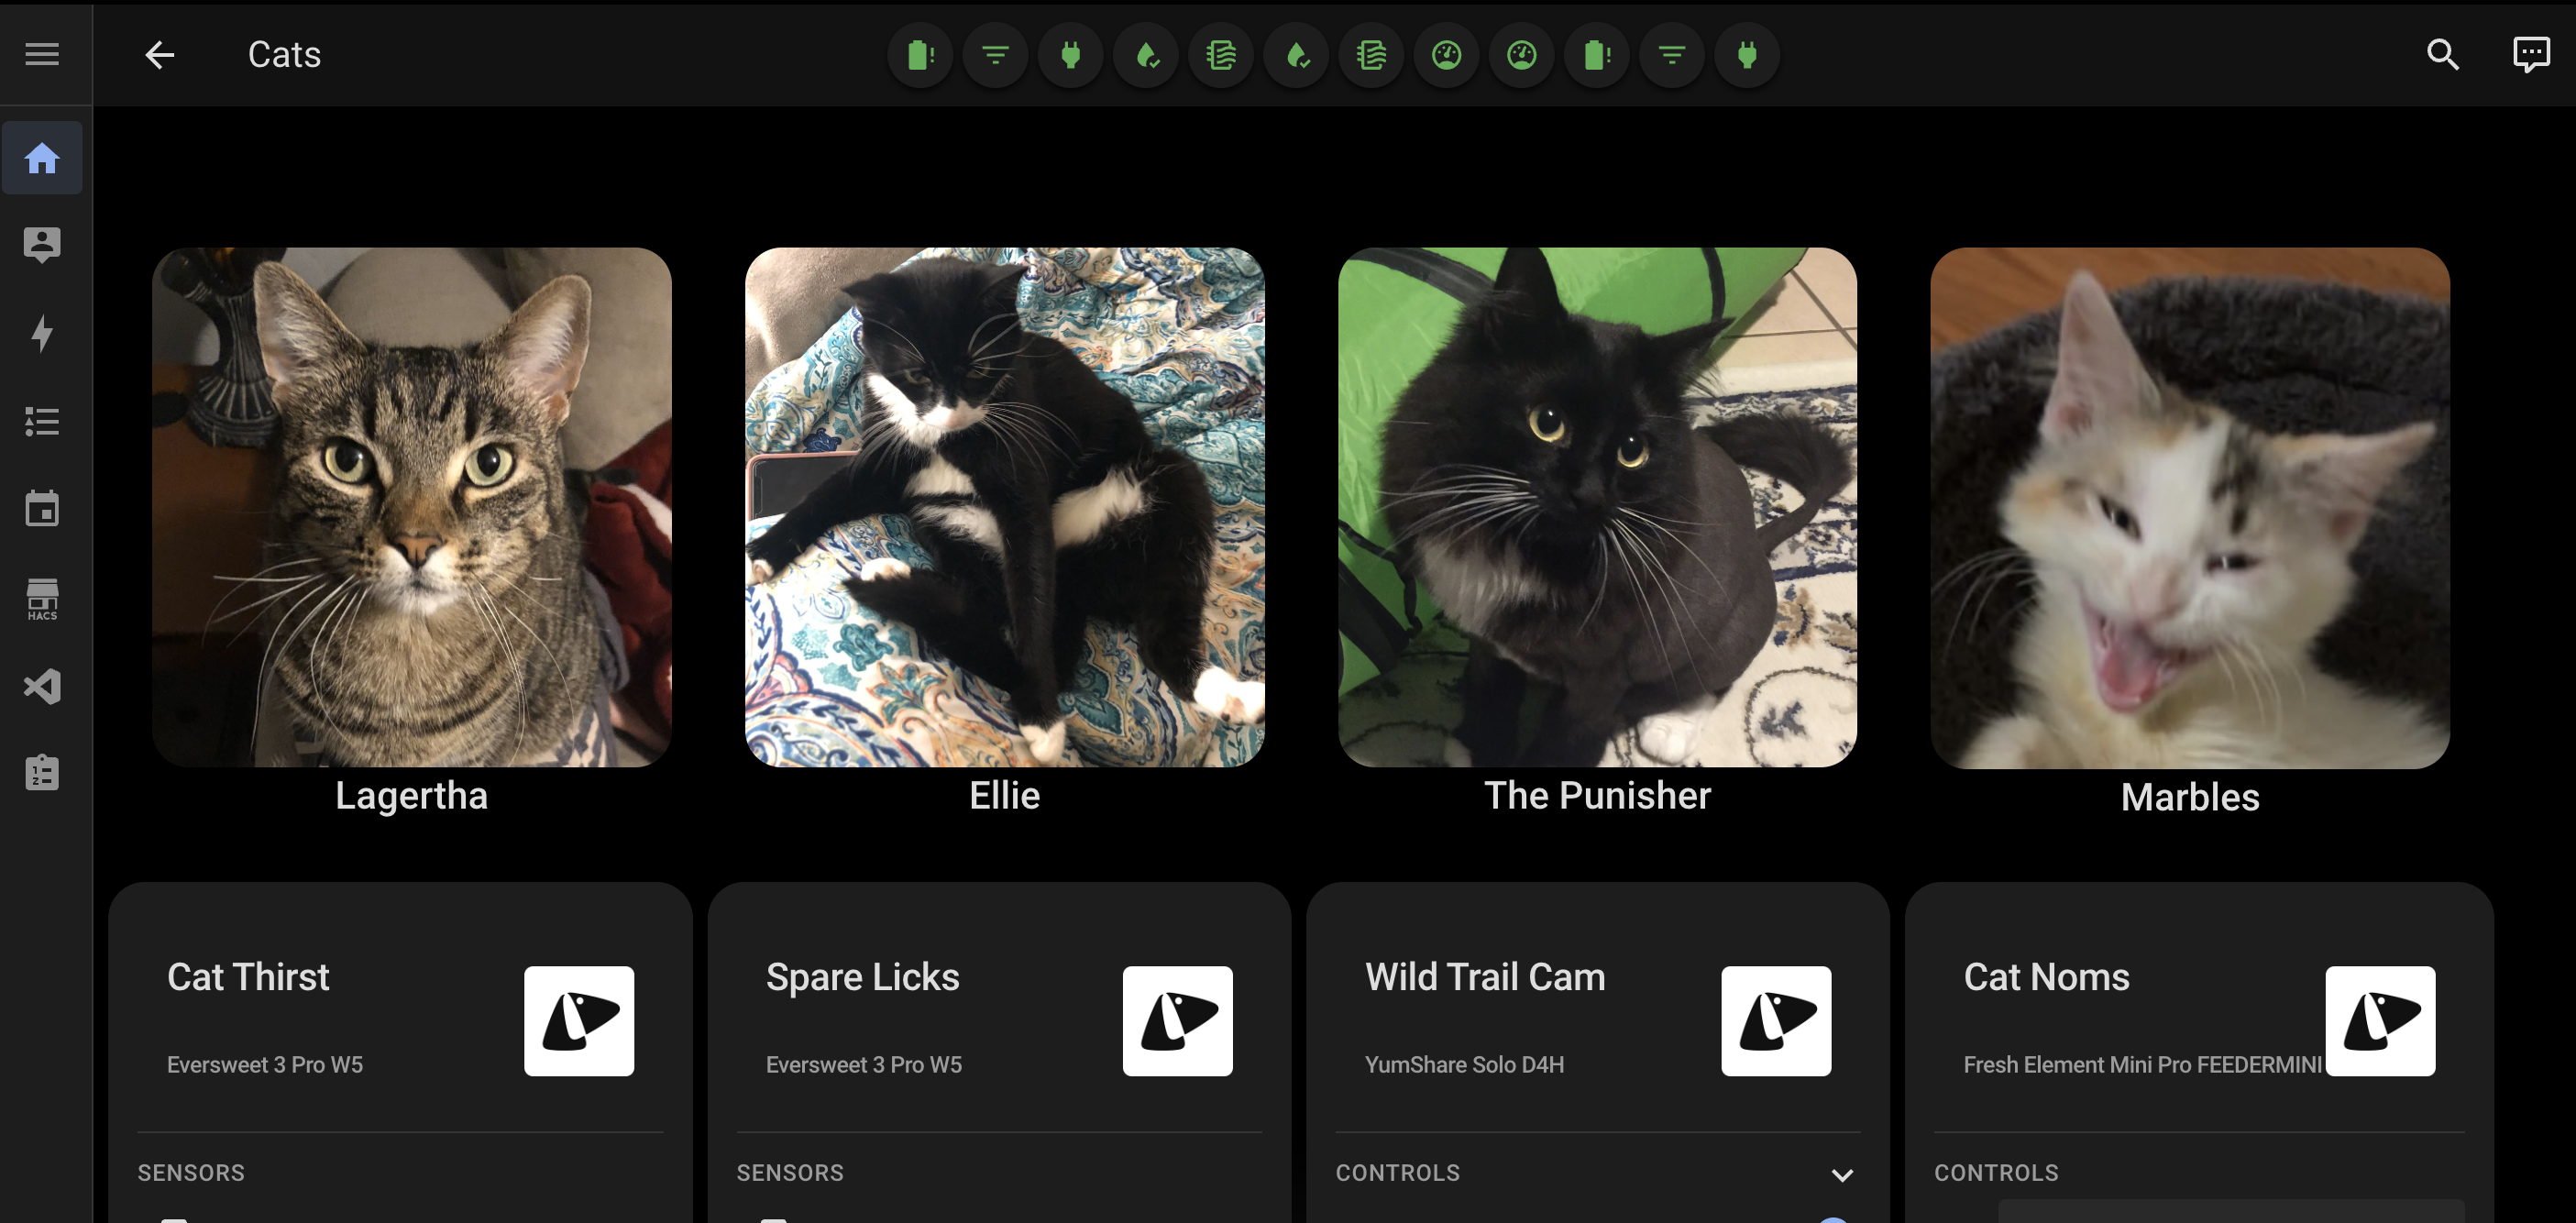
Pet Portraits
With an optional flag, you can showcase your pets instead.
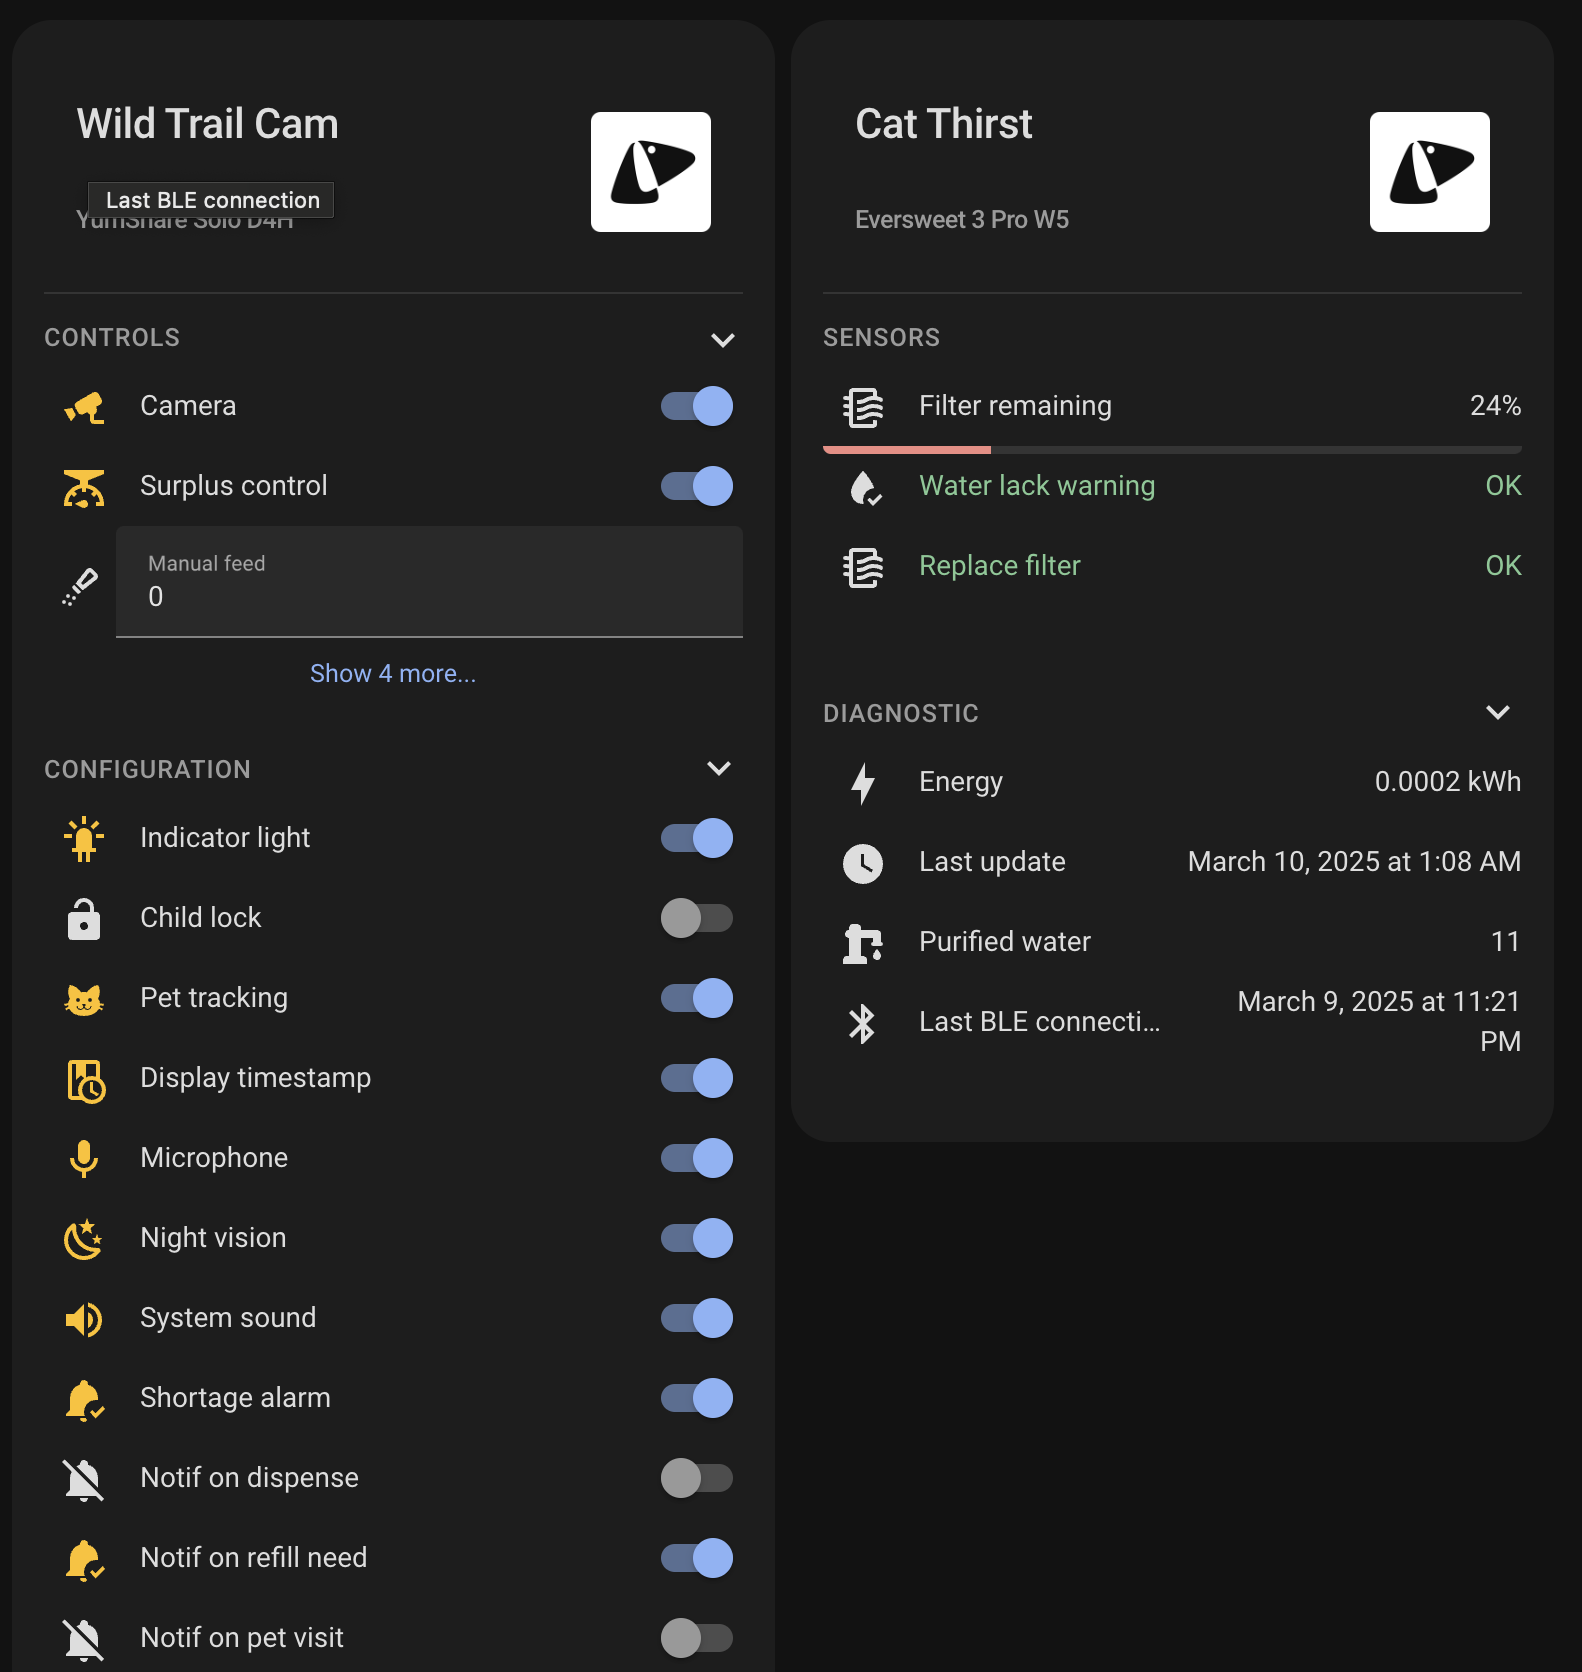
Expandable Sections
- Collapsible sections for better organization of information
- Preview counts for sensors to reduce visual clutter
- Ability to expand sections to see all entities
Entity Interactions
- Click any sensor, control, or diagnostic entity to view more information
- Default action opens the more-info dialog when tapping or holding an entity
- Configure custom actions for tap, hold, and double-tap interactions
- Actions include navigating to other views, calling services, or opening more-info dialogs
- Actions can be configured in both YAML and the visual editor
Visual Styling
- Consistent with Home Assistant design language
- Responsive layout that works on both desktop and mobile
- Clear visual hierarchy for easy reading
Installation
HACS (Recommended)

- Open HACS in your Home Assistant instance
- Click the menu icon in the top right and select "Custom repositories"
- Add this repository URL and select "Dashboard" as the category
https://github.com/homeassistant-extras/petkit-device-cards
- Click "Install"
Manual Installation
- Download the
petkit-device-cards.jsfile from the latest release in the Releases tab. - Copy it to your
www/community/petkit-device-cards/folder - Add the following to your
configuration.yaml(or add as a resource in dashboards menu)
lovelace:
  resources:
    - url: /local/community/petkit-device-cards/petkit-device-cards.js
      type: module
Usage
Add the card to your dashboard using the UI editor or YAML:
Card Editor
The card is fully configurable in the UI editor. Simply select "Custom: PetKit Device" when adding a new card to your dashboard, then select your PetKit device from the dropdown.
YAML
This is the most minimal configuration needed to get started:
type: custom:petkit-device
device_id: YOUR_PETKIT_DEVICE_ID
The card will automatically:
- Display the device name and model information
- Organize all entities related to the device into appropriate sections
- Show collapsible sections for Controls, Configuration, Sensors, and Diagnostics
- Highlight any detected problems
Configuration Options
| Name | Type | Default | Description |
|---|---|---|---|
| device_id | string | Required | The Home Assistant device ID for your PetKit device |
| title | string | Device name | Optional custom title for the card |
| preview_count | number | All items | Number of items to preview before showing "Show More" button |
| features | list | See below | Optional flags to toggle different features |
| tap_action | object | more-info | Action to perform when tapping a sensor |
| hold_action | object | more-info | Action to perform when holding a sensor |
| double_tap_action | object | none | Action when double-tapping a sensor |
Feature Options
| Name | Type | Description |
|---|---|---|
| cute_lil_kitty | flag | Show portrait instead of pet device |
Example Configurations
Basic Configuration
type: custom:petkit-device
device_id: 1a2b3c4d5e6f7g8h9i0j
Custom Title and Preview Count
type: custom:petkit-device
device_id: 1a2b3c4d5e6f7g8h9i0j
title: Whiskers' Feeder
preview_count: 3
Pet Portrait
type: custom:petkit-device
device_id: 1a2b3c4d5e6f7g8h9i0j
features:
  - cute_lil_kitty
With Custom Actions
Configure custom actions for sensor interactions. By default, tapping or holding a sensor opens the more-info dialog.
type: custom:petkit-device
device_id: 1a2b3c4d5e6f7g8h9i0j
tap_action:
  action: more-info
hold_action:
  action: navigate
  navigation_path: /lovelace/petkit-details
double_tap_action:
  action: call-service
  service: homeassistant.reload_config_entry
Available actions include:
more-info- Show entity details dialog (default for tap and hold)navigate- Navigate to a different viewtoggle- Toggle entity statecall-service- Call a servicenone- Disable the action
Supported PetKit Devices
This card works with all PetKit devices supported by the Home Assistant PetKit integration, including:
- PetKit Fresh Element (Smart Feeder)
- PetKit Fresh Element Solo (Smart Feeder)
- PetKit Fresh Element Mini (Smart Feeder)
- PetKit Pura X (Self-Cleaning Litter Box)
- PetKit Pura MAX (Self-Cleaning Litter Box)
- PetKit Eversweet (Smart Water Fountain)
- And other PetKit devices supported by the integration
This card is tightly coupled to the PetKit Integration here, by @Jezza34000:
![]()
Project Roadmap
-
Initial design: create initial card design -
Enhanced customization: Add more customization options -
Status badges: Quick status badges for device state
Contributing
- 💬 Join the Discussions: Share your insights, provide feedback, or ask questions.
- 🐛 Report Issues: Submit bugs found or log feature requests for the
petkit-device-cardsproject. - 💡 Submit Pull Requests: Review open PRs, and submit your own PRs.
- 📣 Check out discord: Need further help, have ideas, want to chat?
- 🃏 Check out my other cards! Maybe you have an integration that I made cards for.
- Fork the Repository: Start by forking the project repository to your github account.
- Clone Locally: Clone the forked repository to your local machine using a git client.
git clone https://github.com/homeassistant-extras/petkit-device-cards - Create a New Branch: Always work on a new branch, giving it a descriptive name.
git checkout -b new-feature-x - Make Your Changes: Develop and test your changes locally.
- Commit Your Changes: Commit with a clear message describing your updates.
git commit -m 'Implemented new feature x.' - Push to github: Push the changes to your forked repository.
git push origin new-feature-x - Submit a Pull Request: Create a PR against the original project repository. Clearly describe the changes and their motivations.
- Review: Once your PR is reviewed and approved, it will be merged into the main branch. Congratulations on your contribution!
License
This project is protected under the MIT License. For more details, refer to the LICENSE file.
Acknowledgments
- Built using LitElement
- Inspired by Home Assistant's chip design
- Thanks to all contributors!
- Maintained by Patrick Masters / Curious Cat Consulting
Code Quality
Forgive me and my badges..
Stats
Ratings
Build Status
Main
![]()
![]()
![]()
![]()
Release
![]()
![]()
Other
![]()
![]()